Using Dependency Injection in WPF MVVM Applications
Although WPF can be written in an MVVM architecture without additional packages, as a web developer, I prefer not to spend too much time researching how to build an MVVM architecture from scratch. Therefore, I recommend using Microsoft's "CommunityToolkit.Mvvm" package for development. For more information on this package, you can refer to the "MVVM Toolkit Introduction".
Using Dependency Injection in WPF
App.xaml
Here, we configure the DI package used in the project. We will use "Microsoft.Extensions.DependencyInjection" as an example (it is not installed by default in WPF). If you need to read settings from "appsettings.json", you will need to install "Microsoft.Extensions.Configuration" and other related packages. This example includes the following packages:
- CommunityToolkit.Mvvm
- Microsoft.Extensions.Configuration
- Microsoft.Extensions.Configuration.Abstractions
- Microsoft.Extensions.Configuration.FileExtensions
- Microsoft.Extensions.Configuration.Json
- Microsoft.Extensions.DependencyInjection
- Microsoft.Extensions.Options.ConfigurationExtensions
public partial class App : Application {
    protected override void OnStartup(StartupEventArgs e) {
        IConfigurationBuilder builder = new ConfigurationBuilder()
            .SetBasePath(Directory.GetCurrentDirectory())
            .AddJsonFile("appsettings.json", optional: false, reloadOnChange: true);

        IConfiguration configuration = builder.Build();

        ServiceCollection serviceCollection = new ServiceCollection();
        ConfigureServices(serviceCollection, configuration);

        ServiceProvider serviceProvider = serviceCollection.BuildServiceProvider();

        MainWindow mainWindow = serviceProvider.GetRequiredService<MainWindow>()!;
        mainWindow.Show();
    }

    private static void ConfigureServices(IServiceCollection services, IConfiguration configuration) {
        services.Configure<AppOptions>(configuration!.GetSection("App"));
        services.AddTransient<MainWindow>();
        services.AddTransient<ViewModel>();
    }
}The StartupUri property of <Application /> is used to specify the first window to create and display after the application starts. If StartupUri="MainWindow.xaml" is specified in XAML, the WPF framework will use that XAML file to create an instance of the MainWindow class. If a constructor with parameters is defined in MainWindow, a "No parameterless constructor defined" error will occur. Since the MainWindow class is now created using DI and will have a constructor containing the types to be injected, the StartupUri property specified in <Application /> must be removed.
<Application x:Class="TPI.Softeare.EntityGenerator.App"
             xmlns="http://schemas.microsoft.com/winfx/2006/xaml/presentation"
             xmlns:x="http://schemas.microsoft.com/winfx/2006/xaml"
             xmlns:local="clr-namespace:TPI.Softeare.EntityGenerator">
    <Application.Resources>

    </Application.Resources>
</Application>Building a WPF MVVM Application
ViewModel
When creating a ViewModel, note the following:
- The ViewModel must inherit from
ObservableObject. - The ViewModel must be declared as a
partialclass. - Properties intended for frontend binding should be created as fields with the
ObservablePropertyattribute; using lower camel case is recommended. - Command methods to be executed must have the
RelayCommandattribute.
public partial class ViewModel : ObservableObject {
    [ObservableProperty]
    private string? input;

    [RelayCommand]
    private void Submit() {
        MessageBox.Show("Input value:" + Input);
        Input += "_Modified";
        MessageBox.Show("Changed value:" + Input);
    }
}Looking at the example above, you might find it strange that we declared a lowercase input, but Submit() uses the capitalized Input. If you hover over the attribute, you can see in the comments that it automatically generates additional code, which is why the class must use the partial modifier.
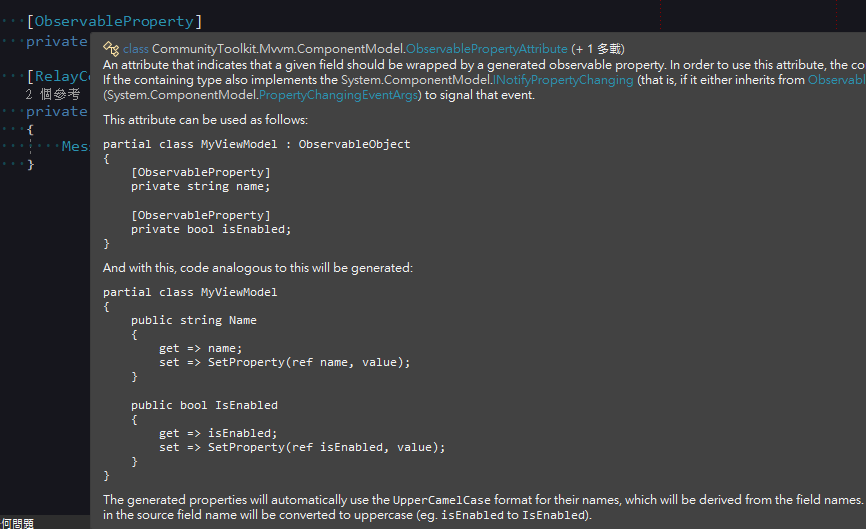
ObservableProperty attribute comments.
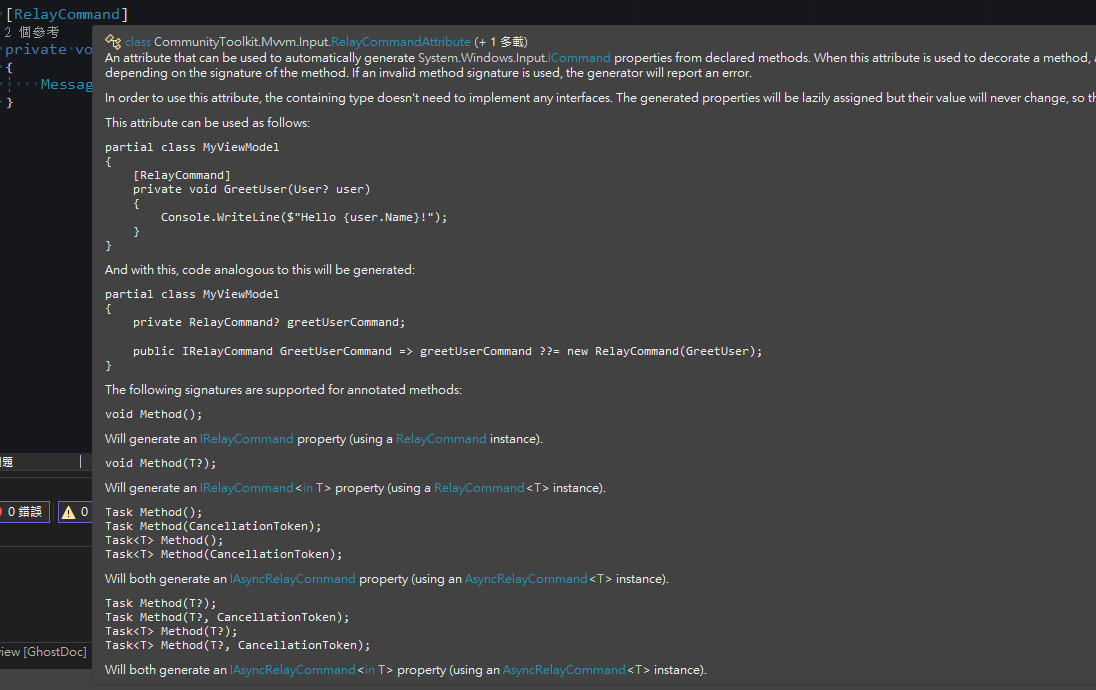
RelayCommand attribute comments.
MainWindow.xaml
Set the DataContext to the ViewModel in the constructor. If using DI, the ViewModel can be passed in via parameters.
public partial class MainWindow : Window {
    public MainWindow(ViewModel viewModel) {
        InitializeComponent();
        DataContext = viewModel;
    }
}<TextBox />usesText="{Binding Input}"to bind the displayed text. Since it is actually binding to the property automatically generated by the attribute, you must use Pascal Case.<Button />usesCommand="{Binding SubmitCommand}"to bind the method executed when the button is clicked. Since it is actually binding to the property automatically generated by the attribute, the method name must have the "Command" suffix.
<Window x:Class="WpfApp.MainWindow"
        xmlns="http://schemas.microsoft.com/winfx/2006/xaml/presentation"
        xmlns:x="http://schemas.microsoft.com/winfx/2006/xaml"
        xmlns:d="http://schemas.microsoft.com/expression/blend/2008"
        xmlns:mc="http://schemas.openxmlformats.org/markup-compatibility/2006"
        xmlns:local="clr-namespace:WpfApp"
        mc:Ignorable="d"
        Title="MainWindow" Height="450" Width="800">
    <Grid>
        <TextBox HorizontalAlignment="Left" Margin="100,50,0,0" TextWrapping="Wrap" VerticalAlignment="Top" Width="150" Text="{Binding Input}"/>
        <Button Content="Submit" HorizontalAlignment="Left" Margin="100,100,0,0" VerticalAlignment="Top" Width="150" Command="{Binding SubmitCommand}"/>

    </Grid>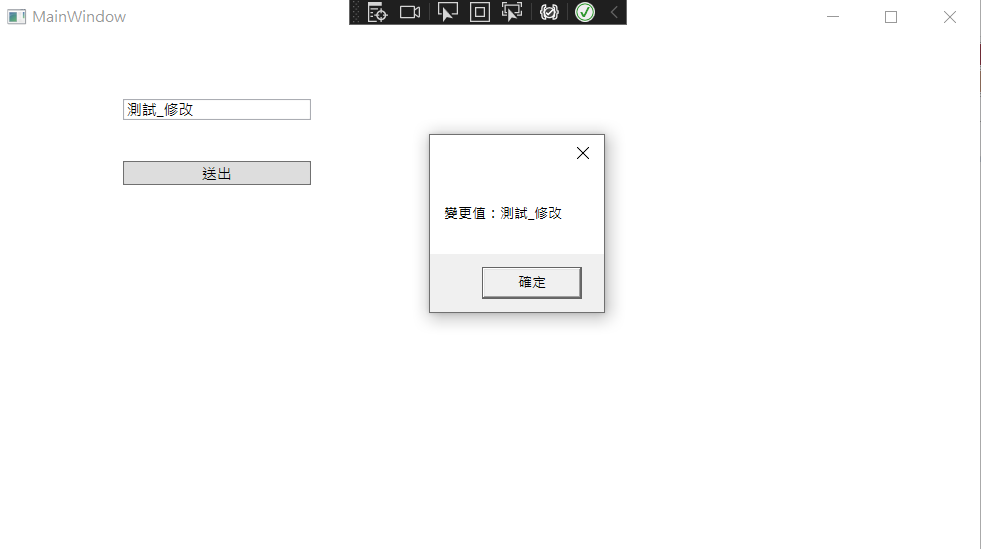
</Window>Execution Results
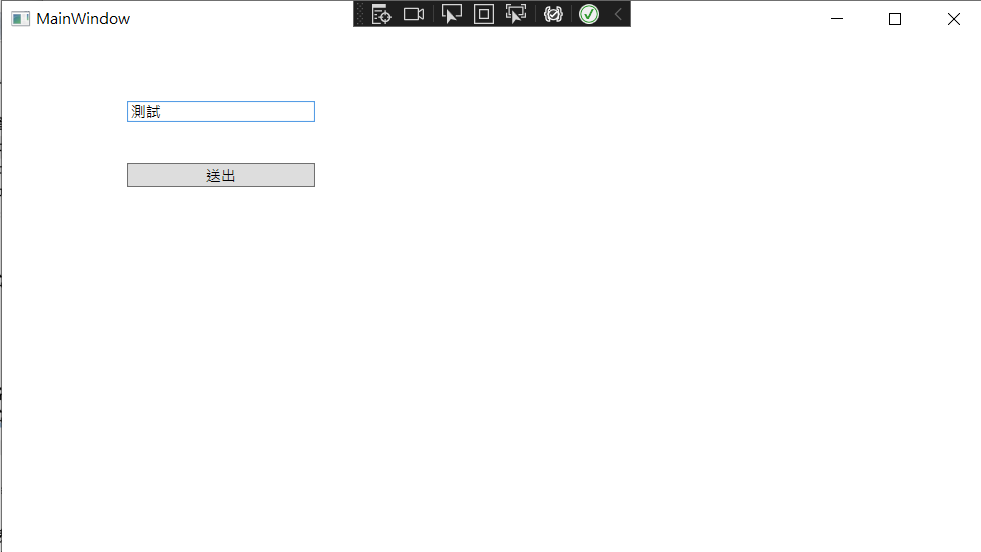
After entering "Test" in the TextBox, click "Submit".
Submit() executed successfully, and the value of Input is the value we entered in the TextBox.
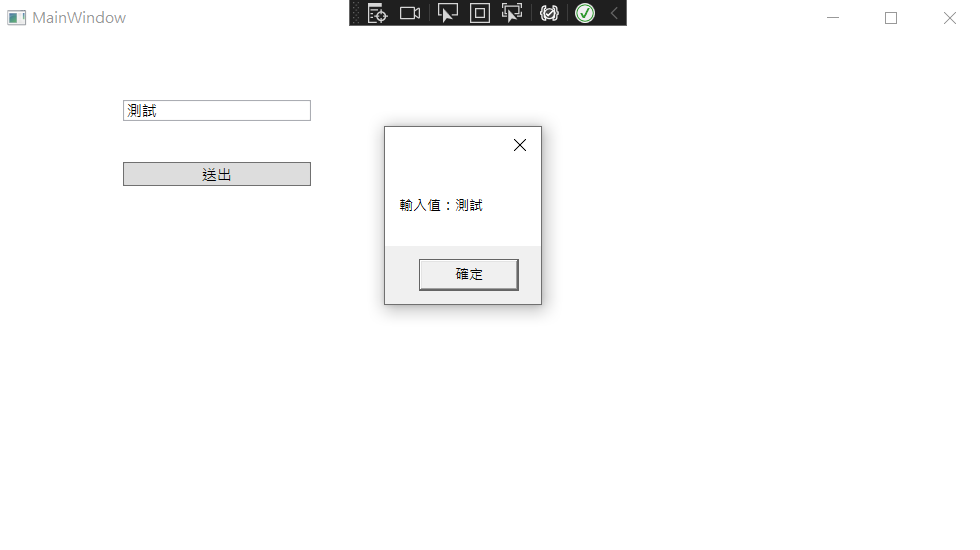
When the value of Input is changed inside Submit(), the content of the TextBox on the screen updates accordingly.
Change Log
- 2023-02-15 Initial document creation.